FRONT
BxCamera® Setup for BxLink™ Lab


BACK
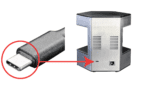
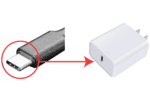
1. Plug the USB-C into the port on the back of the BxCamera and connect the other end of the cable to the USB-C Brick. Plug the Brick a into standard outlet to supply power.

2. Connect an ethernet cable to the camera and the other end to the dongle. Then connect the dongle USB-A end to the computer USB-A slot.


3. Wait for the lights to cycle through the booting process.
- Single rotating light = Booting up
- Entire hexagon flashes = Ready

Light rotating means the BxCam is booting up

When the entire hexagon flashes, the BxCam is ready
4. Type 10.76.77.1 into your browser.
5. Download and install the certificates and bundles following these steps here.
6. Login to BxLink and test the camera to make sure it is working properly.
7. Validate using your lab’s standards.
For additional help and troubleshooting, contact us at support@lumeadigital.com.